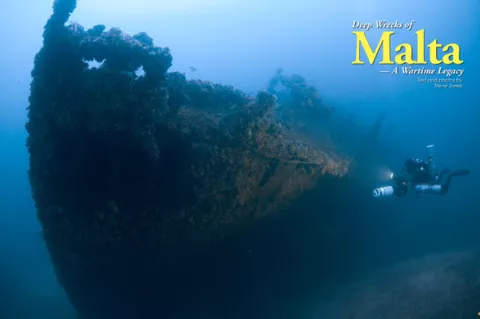
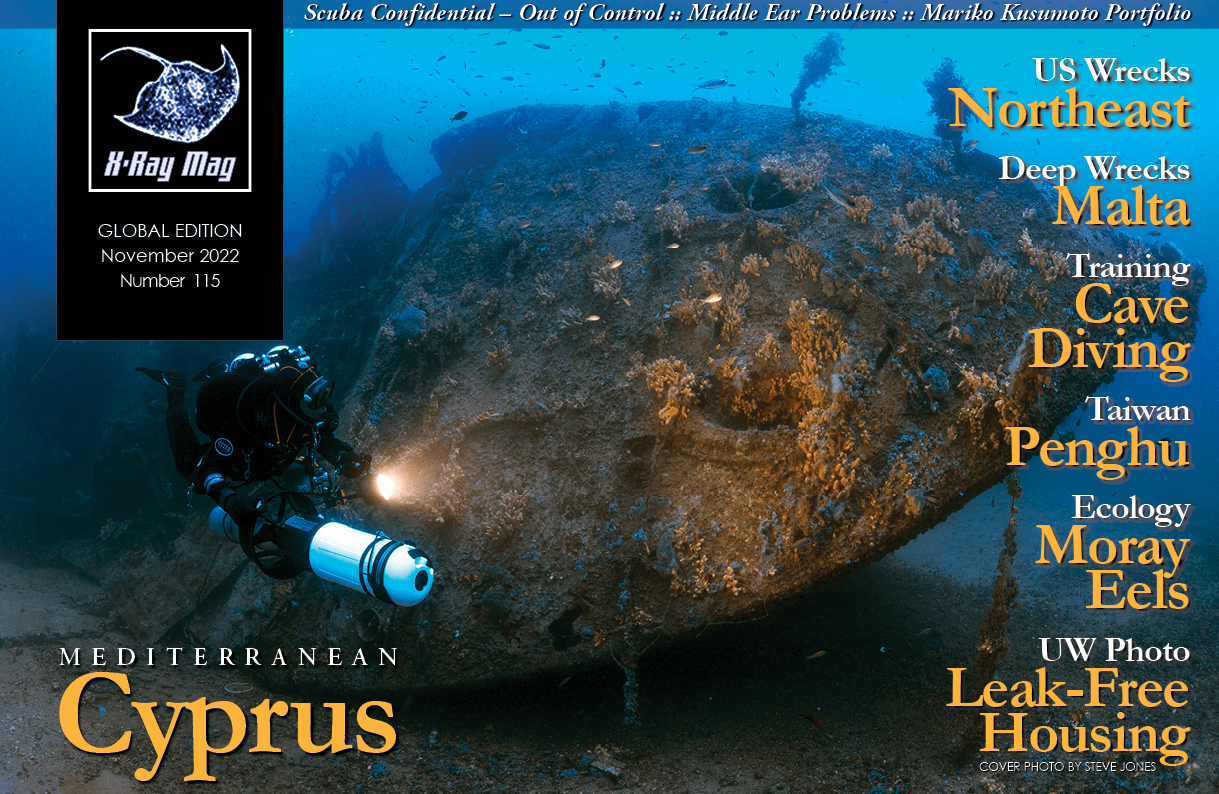
The tiny Mediterranean country of Malta has seen more than its fair share of fighting throughout the ages, such is the significance of its location. Steve Jones explores the fascinating wrecks left by the World Wars.

Contributed by
Factfile
MALTA'S OTHER WARTIME WRECKS
Beaufighter: The hardy twin-engine Beaufighters saw much service in Malta. This aircraft took off on an anti-shipping mission in March 1943 but developed engine trouble. Both crew members escaped unharmed. The wreck is at 40m on bright white sand, a short boat ride out from DiveWise Malta.
Blenheim Bomber: Shot down by an Italian fighter in December 1941. The pilot ditched at sea and all crew members were rescued. Now, it lies at 40m, with one propeller still attached.
HMS Hellespont: A paddle steamer tug sunk by Axis aircraft in April 1942, it lies upright at 45m outside Grand Harbour, with lots to see.
HMS Maori: A destroyer that participated in the hunt for the mighty German battleship Bismarck, this is a popular shore dive in around 15m of water in the Grand Harbour. It was sunk by a bomb in 1942, and later cut into two. The bow lies in St Elmo’s Bay whereas the stern was towed to deep water.
HMS St Angelo: A tug used as a minesweeper, it was sunk in May 1942, and lies at 55m near the harbour.
HM Drifter Eddy: A small minesweeper struck by a mine in May 1942 with the loss of eight lives. Wreck lies at 55m.
X127 Lighter: Originally built to support the ill-fated WWI Gallipoli landings, then used as a fuel barge when it was sunk by dive bombers right in front of the submarine base on Manoel Island in 1942. Lies between 5 and 22m. Visibility is often poor but it is a historically interesting wreck.
Worth knowing: Over the past few decades, multiple other ships such as the massive Um el-Faroud have also been deliberately sunk as dive sites. Malta is a wreck diver’s oasis.
A stream of water trailed behind the bright orange buoy that marked our descent line, making no secret that there would be current on this dive. We jumped far upstream, yet any fast movement was made impossible by the 100kg of gear I was carrying, and the buoy rushed past before I could grab it. Without a second to waste, I squeezed the trigger and my Suex scooter surged to life, powering me back to the line. A long hand-over-hand descent began, and the danger of overexertion lingered on my mind.
Minutes later, we touched down on the seabed at 65m, but before me, I saw only a trail in the white sand where the massive shot line weight was dragged. There was no sign of the wreck. We attached our own line to the shot line and fired up our scooters again, following the rut in the sand until we reached a colossal shadow that heralded our arrival at SS Polynesien, one of Malta’s most spectacular wrecks!
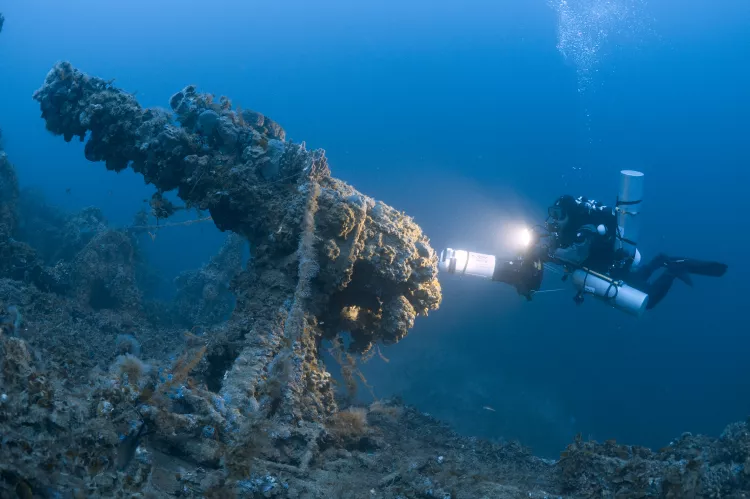
Le Polynesien was a 6,373-ton French liner sunk by U-boat UC-22 on 10 August 1918 during the closing stages of World War I, killing ten. It was carrying Serbian troops at the time. Lying some 11km from Malta’s capital, Valletta, this large wreck lay on its port side and had an intact hull.
We had arrived on the wreck amidships and headed toward the bow, viewing the spectacular superstructure on the way. A solitary gun stood upright, encrusted in marine growth amongst deck machinery. We then looped around and headed back toward the stern where open holds and shafts enticed deeper exploration of this 150m-long ship. In what seemed like no time at all, we reached our time limit, yet only a fraction of the wreck had been explored on this one dive. During the long decompression stops, I pondered which areas to visit on my next dive on this majestic wreck.
An island under siege
During World War II, Malta became one of the most bombed locations in history. Its position was important to British forces as they attempted to disrupt the supply lines to the opposing armies they were facing in North Africa. Initial attention from Italy was met with stubborn resistance, but the Italians were soon reinforced with highly capable German forces with a clear objective: Malta had to be neutralised as a threat once and for all!
Malta was besieged and the population starved. Constantly short of ammunition and fuel, outnumbered defenders were faced with increasing numbers of attacking aircraft. A ferocious and unrelenting aerial war broke out that proved challenging for pilots from both sides, some of whom had already faced each other in the equally fierce aerial war in the Battle of Britain.
The key to Malta’s survival was to keep the island supplied, and convoys became the vital lifeline. Allied aircraft carriers made dangerous passages through the Mediterranean to get within range to fly their fighters to the island. Cargo ships carrying food, fuel and ammunition were under constant attack, which continued even if they made it to the harbour. Much of the legacy of the battle for Malta can still be found in the clear blue waters that surround this tranquil island.
HMS Southwold
In March 1942, with the siege at a peak, convoy MW10 steamed toward Malta with desperately needed supplies. They were spotted by an Italian battleship, but rather than retreat, the vastly outgunned escorts attacked and, despite taking heavy damage, prevented the cargo ships from being intercepted. As a consequence, however, the convoy’s arrival was delayed until the daylight hours, exposing it to aerial attack. HMS Breconshire was hit, and when the destroyer HMS Southwold attempted to tow the stricken tanker away from a British minefield, a mine exploded, killing five. Southwold’s hull then split into two, whilst she was under tow.
These halves of the Southwold now make two separate dives, as they lie 300m apart. The bow lay completely on its starboard side in 68m of water, and we started our exploration near the area where the ship was torn into two, a scene of complete devastation with masses of torn, twisted metal. We scootered forward, passing the top of the recognisable bridge. The whole forward area of the ship was still intact with the main guns pointing straight toward the bow.
A few days later, we ventured to the stern, which at 72m, lay slightly deeper and was upright. Aside from the damage at the break, it was in very good condition, and our first sight was the rear guns, which were still angled upwards as if ready to fire, reminding us that this ship was at battle stations when it went down.
Neatly arranged depth charges could be seen in their racks, and amazingly, the nameplate of the ship was still there. Taking artefacts from any wreck here is strictly forbidden, evidenced by the number of personal items that still lie on the wrecks, preserving the scene from the day they went down. Dropping over the stern to the seabed, I arrived at the huge propellers, still attached, before our time constraints at this depth drew this visit to a close.
On several occasions in 1942, this country’s fate hung in the balance and the surrender date, when fuel, food or ammunition would run out, was sometimes only weeks away. However, with dogged resistance aided by increasing numbers of deadly Spitfire fighters making it through the blockade, the aerial battle began to swing in favour of the defenders. The Axis powers changed their tactics, concentrating their efforts on trying to stop the convoys that were keeping Malta in the fight.
“Malta is one huge battery of anti-aircraft guns.”
Luftwaffe Ju 88 Bomber pilot
Exploring S-31 Schnellboot
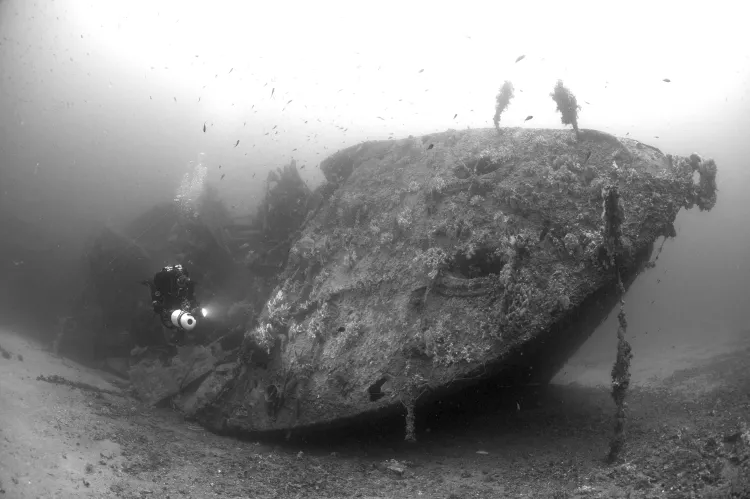
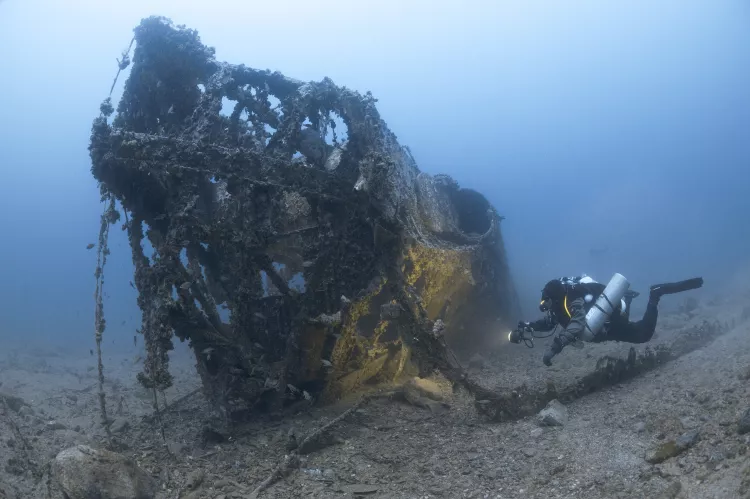
HMS Welshman was a fast ship, targeted by the Axis powers due to its success on supply runs to Malta. In May 1942, a flotilla of seven Schnellboots (fast-attack torpedo boats) set off to sink the Welshman before it could reach Malta. Whilst laying a minefield, the S-31 Schnellboot exploded, probably after detonating one of its own detached mines. Half of the crew of 26 lost their lives.
A current-free descent revealed a wreck like no other I had seen before, looking more like a dinosaur’s skeleton than a torpedo boat. The S-boats were built for speed, constructed of a mahogany outer hull and light metal frame, but the wood had long since rotted away, giving it a distinctive appearance. It was a small 35m-long wreck, but at a depth of 65m and with plenty to see, there was no time to waste. Swimming down from the bow, we soon came across the huge port-side torpedo tube, where an open door revealed a loaded torpedo. S-boats had two of these 533mm diameter torpedo tubes and packed a mighty punch.
Slightly aft of the torpedo tubes, we came to the scene of that catastrophic explosion. Ammunition cases lay scattered amongst numerous artefacts, and we swam past oil barrels before coming to the engines. This craft had not one but three huge Daimlers that provided 3,960BHP to the ship, which weighed only 102 tonnes, propelling it up to 38 knots. My dive partner, Steve Wilkinson, carefully placed my high-powered Orcalight inside the hull. The beam set up a surreal parting scene, making the wreck resemble a dragon’s head, breathing fire one last time.
Stubborn by name, stubborn by nature
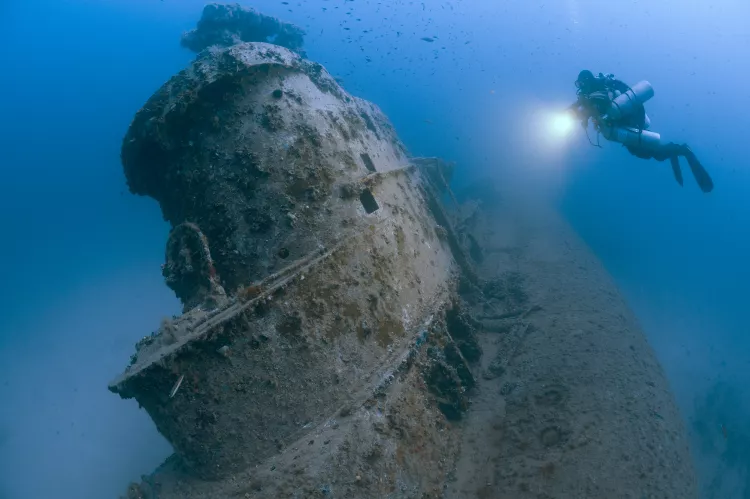
Regardless of which side they fought for, the life of the submariner during both world wars was fraught with danger. The statistics say it all: 52 US, 79 British and a staggering 784 German submarines were lost in WWII, with little chance of any crew member surviving a sinking. It was a sombre thought, before we descended onto a British S-Class submarine.
The cigar-like shape of this heavily armed, highly manoeuvrable patrol vessel appeared out of the blue gloom, and we arrived near a well-preserved conning tower, which lit up in beautiful shades of red and yellow under our powerful lamp beams. In the crystal-clear water, we could see the deck stretch away to the bow, and it was easy to imagine the view the captain once had whilst the ship was at the surface. Swimming forward along that deck, we passed an open hatch before coming to the large hydroplanes, which controlled the submarine’s pitch in the water, helping to determine the angle of dive or ascent.
It was in 1944 that problems with the rear hydroplanes nearly brought about the end of this ship. Following an unsuccessful attack on a German convoy in Norway, the escorts retaliated with 36 depth charges, jamming HMS Stubborn’s rear hydroplanes in hard dive position and sending it to over 115m. The vessel resurfaced twice, still under attack before a third uncontrolled dive sent it beyond 150m, much deeper than its maximum operating depth!
The Stubborn bounced off the seabed four times, as a further 16 depth charges exploded nearby. The attackers broke off, and the crew just managed to generate enough gas to get their sub back to the surface, heavily damaged. As it set sail for home, the rudder then disconnected, but Stubborn was true to its name and made it back, its hull resembling a skeleton’s chest due to the buckling caused by the water pressure.
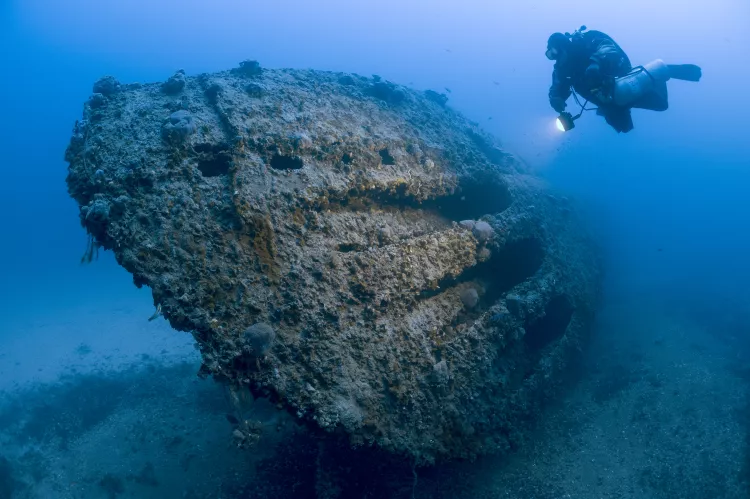
We dropped to the seabed at 55m, and the sleek, knife-edge bow came into view, along with the forward torpedo tubes of which there were three on each side, giving the wreck an aura of menace. It rested nearly upright with a slight list to starboard, which allowed the sunlight to bathe the port side, illuminating this remarkably well-preserved wreck.
HMS Stubborn finished the war in the Far East, during the final months of the battle against Japan. Afterwards, it made a final visit to Malta where its career ended. It was scuttled as an anti-submarine warfare target in 1946. Even though the British Royal Navy knew its location, it was not until 1994 that its position became known to divers.
By November 1942, German and Italian air power were diverted to support the fierce fighting in North Africa, and the siege of Malta came to an end. The Allied aircraft stationed here continued to disrupt Axis supply lines utilising formidable strike aircraft such as the Beaufighter, putting further strain on Axis commander Erwin Rommel’s already pressurised forces. Such was the Battle of Malta’s importance that, if it had fallen, it could well have affected the tide of the North African campaign. In these waters, divers can now visit the legacy of one of World War II’s lesser known, yet pivotal, battles.
SOURCES:
Holland, J. (2009). Fortress Malta: An Island Under Siege 1940-1943. Weidenfeld and Nicholson.
Lemon, P.G. (2016). Scuba Diving Malta—Gozo—Comino. Deltor Ltd, Cornwall.
Special thanks go to operator DiveWise Malta/TechWise Malta (divewise.com.mt / techwise.com.mt), and to models Steve Wilkinson, Stephen Scerri, Howard Shaw and Alan Whitehead.
 the flat-bottom and the Ses Fontanelles I.")


 into their environment which can be traced in water samples.")


")