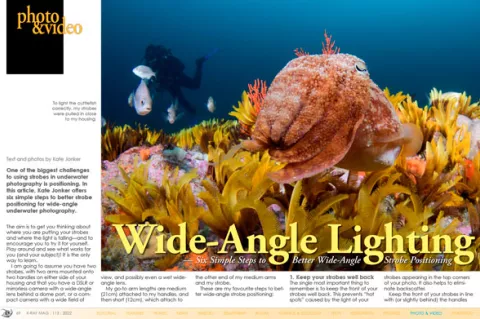
One of the biggest challenges to using strobes in underwater photography is positioning. In this article, Kate Jonker offers six simple steps to better strobe positioning for wide-angle underwater photography.


Contributed by
The aim is to get you thinking about where you are putting your strobes and where the light is falling—and to encourage you to try it for yourself. Play around and see what works for you (and your subject)! It is the only way to learn.
I am going to assume you have two strobes, with two arms mounted onto two handles on either side of your housing and that you have a DSLR or mirrorless camera with a wide-angle lens behind a dome port, or a compact camera with a wide field of view, and possibly even a wet wide-angle lens.
My go-to arm lengths are medium (21cm) attached to my handles, and then short (12cm), which attach to the other end of my medium arms and my strobe.
These are my favourite steps to better wide-angle strobe positioning:
1. Keep your strobes well back
The single most important thing to remember is to keep the front of your strobes well back. This prevents “hot spots” caused by the light of your strobes appearing in the top corners of your photo. It also helps to eliminate backscatter.
Keep the front of your strobes in line with (or slightly behind) the handles of your housing and point them straight forward. If there is lots of sediment in the water, turn them out ever so slightly (about 10 degrees outwards to the side).
2. Strobe power
I normally push up my strobe power quite a lot—sometimes to the maximum, especially if my subject is quite large and I must back off a bit to get it in the frame.
However, depending on your camera settings and the brightness (reflectiveness) of your subject, you might need to drop your strobe power to ensure you do not overexpose your subject. It is all about trial and error to see what strength of power works best with your subject.
If you find that you are getting a lot of backscatter in your photos, drop the strobe power a bit.
3. Strobe distance
Think about the beam of light that is coming out of your strobes. Where is it going to fall? It is cone-shaped and starts off narrow and gets wider, the farther away it travels from your strobes.
To light up your subject, you want to be sure that those beams meet in the middle, and only very slightly before where they hit your subject. If they do not meet, you will have a dark area in the centre of you photo. If they overlap too far forward of your subject, you will light the particles in the water between your subject and your camera and the result will be backscatter.
The general rule here is the farther you are from your subject, the farther sideways (away from the handles) you need to move the strobes. In fact, the distance from your port to your subject should be equal to the distance your strobe is from the centre point of your lens. When lighting huge reef scenes, I use longer arms (31cm) together with my medium arms (21cm) so that I can really push out my strobes.
4. Get close
The reason we use a wide-angle or fisheye lens is to get as close to our subject as possible to light it well. The closer you are to your subject, the better your lighting will be. If you are too far away, your beam will not reach your subject, no matter how much power you blast at it. If you are shooting a big reef or wreck, choose the most photogenic part and light that. You can always use the part that is unlit as a silhouette to add depth to your image.
5. Standard positioning
The standard positioning for wide-angle lighting is to have your strobes on either side of your housing in the 9 o’clock and 3 o’clock position. This is useful for most scenarios, smaller subjects, and divers. If you find you are lighting too much of the reef or sea floor below your subject, lift your strobes higher to a 10 o’clock and 2 o’clock position.
6. Angle to your subject
For the best lighting, you need to hit your subject with enough light for it to be lit evenly throughout. The easiest way to do this is to choose a subject that is completely parallel to your camera. If you are taking the photo with your camera horizontal (landscape), you will easily light up the entire subject without having to adjust the power of either of your strobes.
Sadly, not many reefs are as thoughtful as this, and you may find you will need to push down the power of your strobe closer to the reef or push up the power of your strobe that is farther from the reef (do not push your strobe forward!).
Similarly, if you are taking a photo holding your camera vertically (portrait), keep the strobes at the 9 o’clock and 3 o’clock positioning but drop the power of your strobe now at the bottom so that it does not give an unnatural-looking upwards lighting effect.
Bonus Tip
Remember to keep reviewing your photos in your viewfinder. Zoom in to check either side of the screen for backscatter and reposition your strobes to help prevent this or adjust the strength of your strobes to get the right amount of light on your subject.
Underwater photography, and especially lighting, takes a lot of practice. It does get easier once you understand where and how the light falls, and the amount of strobe power you need to use. Persevere, and your hard work will be rewarded!


")