The more photos we shoot, the more we also have to sift through the numerous images, and the more challenging it becomes to pick out a selection that represents a specific location or subject matter well. Which ones to keep and process and which ones to bin is the question. Rico Besserdich gives you some pointers.
Contributed by
Opportunities are there to be seized. For most divers who do not have the opportunity to dive every day but go on just a few trips every year, it is about making the most of it when you have the chance. And on a typical dive trip, there are only so many opportunities to capture great images. So, just go for it when you have the opportunity, as you may not get another try.
In the earlier days, underwater photographers would usually run out of film before they ran out of air, but present-day still photographers would be hard pressed to fill a memory card before the dive is over, even if they tried. Nonetheless, or perhaps for that very reason, it is only too easy to accumulate hundreds or even thousands of images from diving on weekends at the local beach or lake, or going on a two-week liveaboard in some remote area. Memory cards and hard drives have never been so cheap, resulting in the price for storage falling to only a few cents per gigabyte. For example, an 8Tb hard drive, which I have seen on sale recently for 250 to 300 Euros (US$279-335), can store hundreds of thousands of images. So there you have it.
In the bigger picture, it is clearly not the price of storage that is holding us back. In turn, it begs the question of whether it is really worth it to hold on to vast quantities of images, most of which are of secondary quality or outright outtakes. Obviously when it comes to what should be presented to other people, a selection should be made. Not even your most ardent fan will endure sitting through thousands of your images.
Beginners have a propensity for keeping most, or sometimes even all, of their images. Professionals, on the other hand, go over their images very rigorously and hit the delete button extensively, striving only to keep what meets the highest quality requirements.
It is, however, not just a matter of how strict your selection criteria should be set. The process of selecting images should also be a time for reflection and self-critical analysis, as well as an aid to identify weak points, potentially leading the way to improvement and creative development. Rather than just being frustrated over less optimal images, you should view the results as pointers as to what can be done better the next time. Photography does not, by no means, end when the shutter button has been pressed.
Selecting means making choices and most of them are rejections, but whether you choose to keep 10, 100 or 900 out of 1,000 images is down to both technical criteria and personal preferences such as:
• Technical criteria, e.g., exposure, sharpness, composition, etc.
• Personal preferences, e.g., sentimental value or other emotional connections
Image selection and where they should not be kept
For starters, your camera is definitively not the right place to store your selection of images. Whether submerged at a safety stop, on the boat, on the lakeside or in the waiting hall of the airport, the small size of the LCD display on the camera and its limitations in color and contrast range make it unsuitable to properly assess images, let alone make any final selection. You should only use it for deletion of completely blurred or vastly under- or overexposed images and images you took before the dive to test lighting and exposure settings if you need to free up space on the card.
Images are best viewed on a computer screen when making a selection. Sometimes, positive surprises will stand out that quite simply were not visible on the small camera display, and images that may appear botched at first glance may turn out not to be.
Requirements and preparations
1) Transfer the images to a computer (ideally a desktop) and place them in a folder from where they can easily be accessed.
2) Ideally, you should already have an image editor or viewing software on your computer. At the high end, professional editing software such as Adobe Lightroom, Adobe Photoshop Bridge (part of Photoshop) and Apple Aperture are popular choices among serious photographers, but these come at a price. As for image viewers, there are free versions such as FastStone Image Viewer (www.faststone.org), which will display all popular image formats including RAW and DNG (Digital Negative). It is also possible to view images with the computer’s native file viewer, but these are often quite limited in regards to displaying RAW or DNG image files.
As a minimum requirement, the viewer should be capable of 100 percent magnification zoom. Present-day screens are often capable of at least the classic HD resolution, which is 1920 x 1080 pixels. In comparison, a photo taken with a 10.1 megapixel camera in 3:2 format will have 3888 x 2592 pixels, which is significantly larger than the display size of the monitor. Thus, to evaluate the image in detail, it must be zoomed in to 100 percent. Use the mouse or arrow keys on the keyboard to scroll around and take a closer look at specific areas of interest. The devil (and sometimes, an angel) is in the details, and therefore, it is essential to take a closer look.
3) Ensure your monitor is calibrated. This is very important! Your screen must be adjusted to displaying color, brightness and contrast correctly. Do not assume that the factory setting of a computer screen means it is correctly calibrated.
Ideally, the monitor should be calibrated with the use of an external calibrator, such as the Spyder4Pro Datacolor or the Pantone Huey Pro, which are relatively inexpensive. There are also free, but less precise, online calibrators that can be found by googling “monitor calibrators”. Once the monitor has been calibrated, the viewing, judging and selecting of images should then take place under the same light conditions under which the monitor has been calibrated. Note that monitor calibration should be repeated regularly, ideally every four to five weeks.
4) Take your time and enjoy it. Mindful of the often considerable investment in terms of time, money and effort put into taking the images in the first place, this process deserves your undivided attention and that you set aside the time required. Working in a hectic or noisy environment is rarely conducive for creative processes, so it is better to wait until you can find some peace and quiet, and you feel up to concentrating on the task at hand.
Don’t expect to be able to select more than 100 images out of 1,000 in an hour. In fact, a serious selection process should take place over several rounds, for the following reasons:
• While the purely technical aspects of a photo such as exposure or sharpness can be relatively easy to assess, the emotional evaluation and selection of images is subject to constant fluctuations. This is just human. The way we look at pictures and emotionally assess these changes from day to day, depends not only on personal circumstances and mood, but is also influenced by our immediate surroundings such as music, light, or perhaps a glass or two of red wine.
• Right after we return from a diving holiday or come up from a dive, we are all euphoric, which affects the way we view and select the recorded images. Shortcomings are generously overlooked because the positive memory of the experience overshadows the technical deficiencies. However, it may also work the other way round. For example, a dive that was initially perceived as unsuccessful may dispose the diver to just erase the taken images in a bout of bad mood—even if they are good.
• Emotions are not the sole factor that affects our visual perception and judgment. Photographic training does, too. Thus, images that we first found to be without significance can take on a completely new dimension once we have taken the time to delve into the composition, for instance, and perhaps discover altogether new qualities in an image initially destined for the trash bin.
It is nearly impossible for anyone to dissociate from emotions, but the understanding and recognition of the role that emotions play and how they affect our decisions in selecting images is a considerable insight that cannot be underestimated. Ideally, we should be able to set aside all vested emotions and assess images solely from a purely objective point of view, but in reality, getting even close requires a lengthy learning process and a lot of practice.
Therefore, whenever you find yourself in doubt, leave it for a while and come back to take another look later, be it the next day or even months later. At times, matters are better off left to simmer and mature for a little while.
Classification
Look at your images one after another. Don’t hurry but make a close examination. For a systematic approach, use the following short checklist to make a crude sorting:
"Yes": Continue to the next image.
"No": Delete image or mark for deletion.
"Don’t know": Leave image and have another look at a later stage.
1) Is there anything of apparent interest in the image?
Interest can be aroused in many ways. Often, this is done by the subject matter (animals, wreck diving, underwater landscapes) or also by image statements (conservation, documentation) and image moods (light effects, color effects). Sometimes, it’s even a combination of all. Obvious outtakes, such as shots taken with the lens cap on and test shots, should be deleted right away.
2) Does the image appeal to you?
Often, a purely intuitive first impression manifests itself before and independently of a more objective technical assessment. Sometimes, an otherwise technically perfect picture may not appeal to us, while a technically imperfect picture may immediately make an impression. An image with an emotional appeal should be retained, and if possible, be reassessed at a later stage (as per the fourth point above).
3) Does the image serve your intention?
This is aimed at photographers with a specific objective in terms of specific techniques of photography, or on photographing special motifs. These cases often produce a whole series of images, and it is up to the photographer to decide whether the results fulfill the preset criteria.
If a specific photographic approach has been followed on a dive, it often results in an extensive series of relatively similar images. This is normal. In these cases, it is often better to look at each series in isolation and pick out those individual images that best meet the objectives.
4) Is the image correctly exposed, and if not, can it be corrected?
Evaluate the histograms to assess whether the image has been correctly exposed in relation to the photographer’s intentions insofar as these are apparent. What is deemed correct exposure largely depends on these intentions, but while these cannot always be known, the histogram is generally a quite useful tool.
This is where Adobe Lightroom has one of its strengths. When viewing the images in the library module, the histogram is displayed for each image, allowing for a quick and easy assessment of how it is exposed.
Such software also provides options to correct some exposure-related problems, which can be attempted, such as improving contrast. To what extent the issues at hand can be fixed and whether the image can be improved, also hinges on the dynamic range of the camera used, the overall tonality of the image itself, and in particular, on the file format with which the image was recorded. RAW or DNG formats record and preserve the complete set of image information captured by the image sensor in contrast to the ubiquitous and popular but also ‘lossy’ JPG format, which compresses the file, reducing the available data. Consequently, images saved in RAW or DNG stand a significantly better chance of being successfully corrected than those saved in JPG format.
5) Are the colors what you intended, and if not, can they be corrected?
Unless they were intended to be shot using only ambient light, underwater images captured without flash (i.e. because of a misfire) or the use of artificial lighting, are usually lost causes if they are taken any deeper than 5m (15ft). If there are no colors present, there is none to be recorded, in which case, no software can ever put colors back into the image. A slight color cast is a different matter. This can usually be corrected by subsequent adjustment of the white balance, provided you work with RAW or DNG files.
6) Is the image sharp and the focus where you want it to be?
To properly assess the sharpness of the image, it should be viewed at 100 percent magnification, bearing in mind that even when the image fills the entire screen, it is most often scaled down and thus appears sharper than it really is.
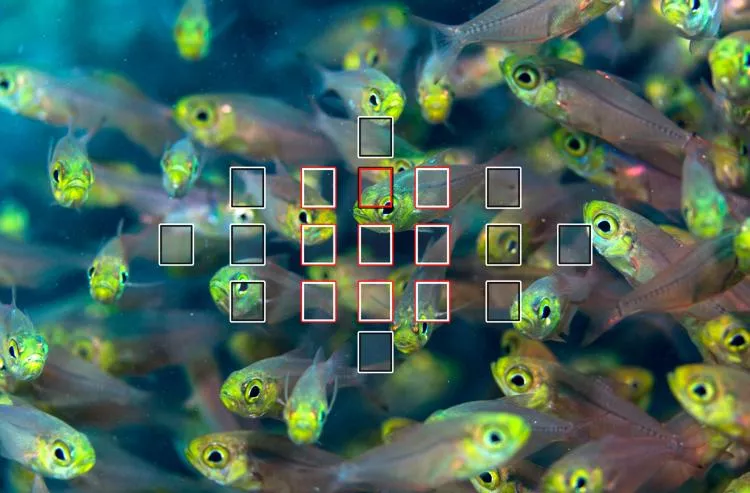
How sharp a picture must be is to some extent a matter of personal taste and preferences. Completely blurred images belong in the trash bin, but if there are any sharp areas in the image, the question is whether this focus is where it matters. If the choice of focus area has been completely left for the camera to decide, the outcome can sometimes be surprising.
--
Tip: A free plug-in for Adobe Lightroom provides information on whether or not and where in the image the camera focused (www.lightroomfocuspointsplugin.com).
--
7) Are the noise, lens distortion and other optical errors within acceptable levels or can they be reasonably corrected?
Unsightly noise in the image may result from shooting with higher ISO-settings, the extent of which depends both on how high it has been set and the quality of the camera. As above, use 100 percent magnification to assess the image in detail. Noise artifacts may be reduced in software but often at the expense of overall sharpness, in which case it becomes a subjective choice as to striking the right balance.
Since no lens is flawless, it is also worth looking at correcting lens errors such as chromatic aberration, distortion and vignetting. As these errors are known and generic in many cases, image editing software offer lens correction filters, which will amend some of these issues. Once again, these work primarily for images saved in RAW or DNG and offered mostly for dSLR and mirrorless cameras.
8) Does the composition work?
Is there a recognizable composition? Is it pleasing? Can the image be improved by cropping it in any way? Composition is a complex matter, and there is much more to it than the well-known rule of thirds. Suffice it to say skillful composition matters just as much as the subject matter itself.
Even in cases where you have answered "no" on the initial sorting checklist, I still recommend that you retain a copy of the image somewhere on a hard disk. Because over time, with experience and knowledge, you will come to view your images in a different light, and at times, discover previously unknown potentials and qualities.
--
Tip: Some photo viewers and editors provide the option to assign a grade to images i.e. by a number of stars. The more stars, the better the picture. This feature is useful to perform a crude first sorting of your images into, say, a first choice, second choice and third choice, thereby avoiding the risk of deleting some of them too hastily.
--
While some of the points on the checklist are relatively straightforward, other points will require a bit more effort in terms of critical review, consideration and perhaps even reflection on your own photographic work. The latter process is, however, a quite important one, as it will also enable you to evolve as a photographer, even with the camera sitting idle in the drawer waiting for the next dive. ■
Rico Besserdich is a widely published German photographer, journalist and artist based in Turkey. For more information, visit: maviphoto.com.


