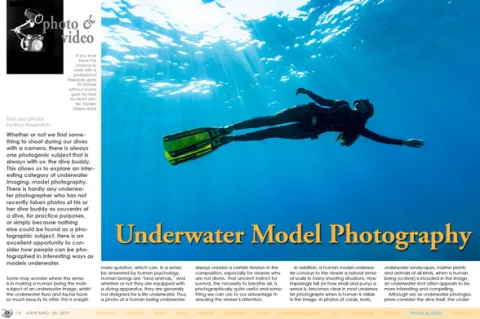
Whether or not we find something to shoot during our dives with a camera, there is always one photogenic subject that is always with us: the dive buddy. This allows us to explore an interesting category of underwater imaging: model photography. There is hardly any underwater photographer who has not recently taken photos of his or her dive buddy as souvenirs of a dive, for practice purposes, or simply because nothing else could be found as a photographic subject.
Here is an excellent opportunity to consider how people can be photographed in interesting ways as models underwater.


Contributed by
Factfile
Rico Besserdich is a widely published German photographer, journalist and artist based in Turkey.
For more information, visit: Maviphoto.com.
See his latest book at: Songofsilence.com.
Some may wonder where the sense is in making a human being the main subject of an underwater image, whilst the underwater flora and fauna have so much beauty to offer. This is a legitimate question, which can, in a sense, be answered by human psychology. Human beings are “land animals,” and whether or not they are equipped with a diving apparatus, they are generally not designed for a life underwater. Thus, a photo of a human being underwater always creates a certain tension in the composition, especially for viewers who are not divers. That ancient instinct for survival, the necessity to breathe air, is photographically quite useful and something we can use to our advantage in arousing the viewer’s attention.
In addition, a human model underwater conveys to the viewer a natural sense of scale in many shooting situations. How imposingly tall (or how small and puny) a wreck is, becomes clear in most underwater photographs when a human is visible in the image. In photos of corals, reefs, underwater landscapes, marine plants and animals of all kinds, when a human being (a diver) is included in the image, an underwater shot often appears to be more interesting and compelling.
Although we as underwater photographers consider the dive itself, the underwater world and the other divers in the water as relatively “normal,” this is not the case for many non-divers. To them, the world of the oceans is a miraculous and mysterious unknown realm, and diving is an activity for risk-seeking adventurers. With our photography, however, we can make the beauty of the underwater world accessible to a huge range of people. This air of mystery can give our underwater images an extra sense of drama in which underwater models can come in handy as well.
Working underwater with a model can be time-consuming and complicated, but it does not have to be so. There are different forms and imaging concepts that can be explored; some of them can even be realised in a swimming pool. Whether with a dive buddy, freedivers or children in a lake, the sea or the local swimming pool, the “basic pillars” of underwater model photography consist of the following:
• Planning
• Cooperation
• Communication
• Pose
• Buoyancy
Let’s now move towards well-planned and executed photos with a model.
Planning
The beginning of the creative process is the idea. Advanced photographers, as well as professionals, first develop an idea; then they make a plan as to how the idea can be realised; and then, as the last and final step, the actual execution of the plan underwater follows.
Developing an idea depends on imagination, creativity, local possibilities (the type of water) and available equipment. Every person has ideas and finding or developing an idea is an important part of the photographic design process. The “creation” of a special image starts long before the actual click of the shutter button. Sources of inspiration for a good idea can be found in dive magazines as well as on the Internet, where many outstanding underwater photographers present equally outstanding underwater model photos.
Once there is an idea, planning follows:
• What do I need to realise my idea?
• How do I configure my underwater camera equipment and settings?
• When, where and with whom should the photo shoot take place?
• What are the local conditions?
• Are there certain (extra) security aspects to consider, and if so, how can they best be realised?
• What should the model do, and what should I do?
• How do I communicate with the model, and how do I explain the idea or concept to the model?
It is helpful to jot down some notes. Some photographers outline the planned image in advance. No artistic skills in drawing are required here; a very simple sketch will help the process of visualisation immensely.
Cooperation
A good photograph with an underwater model is the result of excellent teamwork between the photographer and the model. The performance of the model has the same importance as the performance of the photographer. Therefore, the model deserves 50 percent of the “credit,” at least! Good cooperation between the photographer and the model almost always results in a good image.
It would be unwise to simply use the model as an “object.” Let the model participate in your idea and also in the planning. You will find valuable input that certainly will benefit the planned images.
It is (in my humble opinion) also the photographer’s duty to ensure a positive and relaxed atmosphere. Idea exchange, conversation and respect for the model and his or her performance are important factors. It is a simple principle: Relaxed and happy models perform better! No one feels good being “pushed around,” criticised or even bossed around. This applies to the dive buddy from a dive club as well as the professional model. Your (underwater) models can be the keys to your success—treat them with respect.
Let your model participate in your vision and understand that the realisation of your idea is a team effort of equal team members. Be ready for and open to cooperation, as well as to (positive) surprises—sometimes with a complete rethinking of your initial idea.
Communication
Many of you probably know the frustrating feeling that arises when you are trying to photograph a model properly underwater, and your well-intentioned (and what you thought were completely clear) instructions by means of hand signals (which may grow into energetic arm waving, accompanied by curses shouted into your regulator), often receive only glances of incomprehension or shrugs from the model, or, in the worst case scenario, result in an exasperated model swimming away. The model is confused, the photographer is frustrated, and the hoped-for image is not in the can—another frustration! Often, this is due to the (not-so-ideal) communication between model and photographer.
Communication is also a question of the right arrangement. Such an agreement should, of course, take place before the actual photo dive. Our communication options underwater are limited. The solution lies in the briefing, or preliminary discussion, just before the dive.
Agree with your model, ahead of time, on just a few (!) hand signals to use to communicate during the actual shooting. Please note: The model does not see what you see. He or she usually has no idea of how the scene in your camera viewfinder looks, and therefore (if the model is good and willing) relies on clear “instructions” by means of hand signals.
Limit communication to just a few hand signals that you have previously agreed upon. Too many hand signals will confuse the model. The commands: “Forward,” “Back,” “Up,” “Down,” “Stop” and “Again” are often sufficient here. Plus, a hand signal meaning: “One moment, please” (e.g. in case you want or need to change settings on your camera) is a good signal to include as well.
Also plan and discuss underwater hand signals with which the model can communicate with you. You may have your problems with camera settings, lighting and composition, but even models may have their own problems or desires and need to be able to communicate them to you. “Okay?” “One moment,” “I am ready” and “I want to cancel” are standard signals that should be discussed before the dive to ensure a good shooting session as well as safety.
Only a few underwater photographers have the advantage of an exclusive model who does nothing but pose patiently and indefinitely. What is more common is that dive buddies act as underwater models. This then often happens on a shared dive. If this is the case, then the patience of the model should not be overstrained. If all agree to the plan for the shoot, then a specific time and period of the dive for the model photography can be arranged. With appropriate preparation, a lot of photographic work can be done in just five to ten minutes. This leaves enough time for your model, or dive buddy, to enjoy the rest of the dive for himself or herself.
From the point of view of an underwater model, the photographer is usually hidden behind the camera, performing mysterious things. It is hard for models to know exactly when the image is being taken and when exactly a particular pose, facial expression or position is to be presented. If the flash ignites, then it is already too late.
Here is a suggestion: In most underwater cameras, the trigger is operated with the index finger of the right hand, and the index finger of the photographer rests almost constantly on the release button. Pressing the release button is only a very small movement, which is often not noticeable to the model. As a visual aid for the model, the photographer’s forefinger can be used as a “signalling device.” An extended forefinger can signal “Attention, recording.” The model then knows that the image will be taken within the next few seconds and can set up accordingly.
In a way, that is also part of the communication. If you think you have managed to take a very special photo, take a very short break to show the image to the model. Share your enthusiasm! This motivates the model and creates a nice atmosphere. You will see that your model will be even more enthusiastic about subsequent recordings. Motivation is important. Encouraging this motivation and creating a relaxed work environment for the model is the task of the photographer. So, communicate with the model if you are particularly pleased with a shot.
Pose
The pose of the model is often crucial for a successful image. A scuba diver as an underwater model should, of course, be an “ideal diver.” A straight back, straight legs and arms, with hands close to the body is the classic pose. There are as many exceptions as there are creative possibilities. But in general, the model should look good. Period.
There are lots of poses and what is best suited for the planned image is something that should be considered and agreed upon beforehand. For experienced photographer-and-model teams, the model knows the classic poses, or the photographer’s favourites, and plays them through for several shots. For beginner teams, however, it is recommended that they keep to a maximum of two to three (previously agreed upon) poses.
Buoyancy
Perfect buoyancy is another important key factor in successful underwater model photography, and this applies equally to the photographer and the model. Many beautiful “classic” underwater images show a model in close proximity to coral—sometimes, just centimetres away. In these cases, even the photographer is very close to the action, no matter how “wide-angle” the image may look like later.
Careful buoyancy is important for the protection of marine animals and plants, but also for self-protection. Only a perfectly balanced model can pause at the right moment in the desired pose, and only a perfectly balanced underwater photographer can reach the ideal shooting position... and stay there for a while.
Protecting nature and the safety of those involved (photographer and model) should always take precedence over anything else in an underwater photo shoot. If the underwater world (coral reef, for example) is endangered or directly threatened by our presence and circumstances (current, for example), the photograph will be a failure. There is no photo in the world that justifies broken coral, agitated sediment, stressed animals or other “damage.” The same applies to “self-protection,” as in the case of currents, waves or other “hindering factors.” To ensure the 100 percent safety of all participants, it would be better to abort the shoot or try to move to a safer place. For such cases, it is good to have a “Plan B” (i.e., what to do in case a shoot at the originally planned location is, for safety reasons, not possible).
Shooting situations and scenes
There are a variety of possible shooting situations in which a human model underwater can play an important role or even be the sole protagonist. Here are some examples:
• The human as a diver in the context of the underwater world
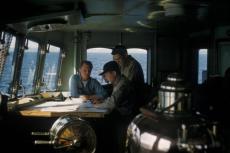
This is the variant that is most frequently used. Often, the model is the dive buddy, who happens to be in the vicinity, and thus, is “basically available,” assuming there has been an appropriate prior agreement and briefing. Photographer and model are both (in most cases) equipped with scuba gear.
• The visual statement: A human exploring the underwater world
As previously mentioned, this theme offers the viewer a relationship to the event, complements the understanding of the image, awakens especially positive associations or feelings (e.g. “I would like to dive there too”), and to non-divers, offers an impression of the exotic and adventurous. The attention of the viewer is assured. In addition, a comprehensible sense of scale regarding the dimensions of an object or subject matter underwater is achieved when a human model is visible in the image. The size of a shipwreck, for instance, or the (comparatively) fragile minuteness of a nudibranch, become evident to the viewer almost automatically when a human being (a diver) is part of the image composition. Applications and subjects of this theme include:
- a) Diver exploring a shipwreck
- When it comes to photographing the size of a wreck, the model is usually completely visible in the image, sometimes even just as a silhouette.
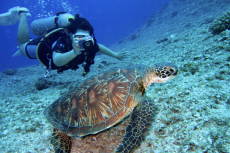
- b) Diver looking at underwater flora and fauna
- c) Divers exploring imposing underwater landscapes
- Whether in tropical seas or in a lake, if the visibility is good, a diver (as a model) adds that “special something” to an underwater landscape shot.
Safety aspects
Assuming that both model and photographer are underwater as fully equipped scuba divers, the known safety protocols include buddy checks, control of depth, no-stop time, air consumption, as well as consideration and planning for special local conditions such as visibility, current, waves and other safety-related factors. These are safety procedures that also count for underwater photography activities.
It is important to strive for a certain discipline. Often, in the “heat of battle” and especially in underwater photography, dive depth, remaining no-stop time and air consumption are not controlled as well as they would be when diving without underwater photographic equipment.
Indeed, some underwater photographers have found themselves after “just taking a few shots” with a remaining pressure of 60 bars at a depth of 25m! Despite all the passion one may have for underwater photography, such high-risk incidents should be avoided, and the fact that more air is consumed during underwater photography dives (due to more movements made in changing position while photographing as well as perhaps sheer excitement) should be well considered in dive planning. This applies equally to photographer and model.
In order to avoid or at least reduce this additional stress and risk factor, it is advisable to conduct underwater model photo shoots in rather shallower (3m to 15m) depths, if possible. Some underwater photographers (such as Dr Alex Mustard) mount the dive computer directly on the underwater housing or on the strobe arm to have both the camera and dive data in view at the same time.
Brief tips
Streamlining. A scuba diver as an underwater model should have his or her dive equipment well-configured and mounted. “Close to the body” is the motto; hanging brackets, dangling regulators or other equipment should be avoided, if possible. Dive equipment should be kept as simple as possible; models decked out like “diving Christmas trees” are usually not very photogenic.
Pointers. A scene such as “a diver looking at a coral” implies that the model really looks at the coral and does not look straight into the camera. If the model uses a dive light as a pointer (which is quite popular in such situations), the dive light should be aimed at the object of exploration (e.g. coral) and not indiscriminately into the blue, or even at the photographer’s face.
Bubbles. Pay attention to the breathing rhythm of the model! Air bubbles, especially when they are close to the model’s face, often disturb the image. Therefore, it is important to signal the model just before you take the shot, using a hand signal that conveys the message: “Attention, recording” (see description above). If this is not possible, then the photographer’s observation skills are required. Observe the inhalation and exhalation frequency of your model and adjust accordingly.
How the model inhales and exhales is, first of all, the model’s job alone. Influencing or even controlling the breathing frequency of the model creates a rather unpleasant atmosphere. This is to be avoided. Experienced (and sometimes paid) underwater models know about this issue and can control their respiratory rate accordingly.
A few exhaled air bubbles in the image and then far above the model (perpendicular to the water’s surface) are not necessarily disturbing; they can, in some cases, even contribute positively to the image’s composition, since the “bubbles” act nicely as the scuba diver’s “signature.” Especially with wide-angle shots (wreck shots with divers, for example), images without “bubbles” (well, not in front of the model’s face!) sometimes seem static, even unrealistic.
Swimming position. If the model is completely visible in the image, an appealing as well as understandable swimming position is recommended: spine and legs stretched out, arms close to the body, and fins in a natural swimming motion (not at right-angles to the shins). It is also important that the dive model can be recognised as a diver in the image, especially in silhouette photos where the dive model just appears as a dark shape. If the model is not swimming, but just floating above or near a wreck for example, presenting the model in an upright position in the water, with a dive light (if carried) in the middle of the body, can give certain wreck photos a special flair.
Masks. While most underwater photographers prefer donning black silicone dive masks because they provide easier viewing in camera viewfinders while avoiding light reflections from the mask, submerged underwater models are more likely to opt for translucent dive masks with large lenses and transparent silicone. This makes it easier for the photographer to illuminate the eyes of the model. Some specialists still use the very large aperture masks from the early dive pioneer days, as these are still excellent, despite being contrary to all modern trends, for the purpose of ideally illuminating the face of the model. The sense (or nonsense) of using “old” diving equipment in modern underwater photography remains, of course, a personal matter of taste.
If your chosen model is an underwater photographer and you depict him or her photographing the underwater flora and fauna, such a scene could work nicely as a photogenic and compelling image statement. In such cases, it is important that the model photographer and the subject matter targeted (by the photographer) are equally reflected in the image.
Freediving underwater models
This refers to models posing underwater without scuba equipment, whether as the classic freediver equipped with dive mask, snorkel and fins; or just as a human being underwater without any diving equipment. Here, things get creative, but in some cases, more involved, regarding preparation, implementation and safety.
The freediver. Freed from bulky scuba diving equipment, the freediver symbolises diving in its most natural form, representing the feeling and experience of the underwater world on only one breath or the human at one with nature and the element of water in which there are no “earthbound” constraints (gravity), just peace and silence. In a sense, the subject is almost philosophical in significance, even in an image.
The freediver as a model in an underwater image “turbo-charges” the senses of the viewer. For experienced and ambitious freedivers, it is nearly “normal” to be in this environment. For some well-trained scuba divers, it may also seem sort of normal. But for the rest of humanity, it is a mystery how someone can dive “without air” and look so good.
Applications. Whether a freediver is ascending, descending or just floating in the blue open water, exploring a wreck or an interesting underwater landscape, just observing underwater flora and fauna, or even just lying on the ocean floor, they (almost) always look good in underwater images. Freediving models have the body coordination and elegance to hold their positions in the photographic foreground.
All this does not have to happen in deep water. A few metres of depth is usually enough; even positions just below the water’s surface will create beautiful images.
In such model shoots, good results often occur when the underwater photographer, equipped with scuba, floats in shallow water (2-5m) while the freediver ascends and descends, presenting his or her poses in a previously marked area and in a fashion that has been previously rehearsed. When working with professional or semi-professional freedivers as models, one might think that a few metres more depth may be required. However, extra depth is not necessary, as the visual sense of “depth” is realised by photographic technique rather than actual depth of immersion.
The classic freediver model is often equipped with a neoprene wetsuit, dive mask and fins (sometimes special, extra-long freediving fins). Some use snorkels, but many do not. From a photographic point of view, both situations are okay, but photos without a snorkel have slight advantages, as it frees up the mouth, which is also an important part of facial expression.
Safety aspects. Ideally, you have another safety diver or swimmer on hand, watching and supporting the model, if necessary, at the surface of the water. If this possibility does not exist or cannot be realised, you should operate only in shallow water (2-3m) and be attentive and willing to put your camera aside at any time to provide assistance to the model if needed.
The freediving model, not the photographer, determines the rhythm of diving, posing and surfacing.
A buoy secured by a rope, or any other floating device with sufficient buoyancy, allows the model to take breaks (without effort) at the water’s surface between shoots. Breaks are chosen by the model, according to personal needs.
An emergency plan must be made, one which is clearly understood and agreed upon by all (!) participants. It should be easy, efficient and feasible.
This type of model shoot should not go into overtime. The main effort here lies with the model (despite how effortless the model may look in the resulting images), so the descent and ascent cycles should be kept within a manageable framework. If the shoot is well-prepared, just 10 to 15 minutes will suffice for five to seven descents and ascents by the model. This will also spare the ears of the model, as it will limit the time the model has to do repetitive pressure equalisation.
If the possibilities at the location permit, then it is a good idea to schedule several short shoots, with appropriate rest periods in between (which are also good opportunities for brief discussions), spread out over half a day. Water and other drinks for hydration as well as fortifying snacks should be available to models between shoots. This should also be included in the planning.
The model has the right to premature termination of the shoot at any time, for whatever reason.
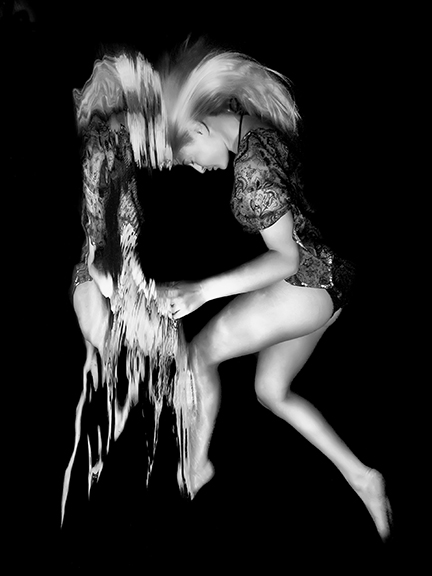
The human underwater
In the previous part of this article, we talked about divers who have freediving skills or at least experiences with snorkelling, so the following is dedicated to the human being as a model underwater. At least now, the model is the star of the scene and as such, preparations for the shoot must be adjusted accordingly. From the specific surroundings, backdrops, sets and lighting to the model’s poses, clothing, accessories, make-up and props—all are primarily selected exclusively to translate photographically, the beauty of humans in an unfamiliar and exotic environment.
It often gets very artistic here, as specialised underwater model photographers access a variety of ideas, equipment and props. It is also not uncommon to work with several models simultaneously underwater. The effort is often great, but the results are breath-taking. Cal Mero, Todd Essick, Zena Holloway, Cheryl Walsh, Ken Kiefer, and Rafal Makiela (and many others) are renowned photographers, whose underwater model photos show inspiration and creativity.
This type of photography sometimes takes place in the sea, but more often in swimming pools, which then serve as underwater photo studios, so to speak.
Image statement. It can be whatever you want! In this case, the element of water becomes an “exquisite location,” and there are no limits to the imagination. When the model is finally the sole subject, one can and should play and experiment with different ideas. Humans floating in the weightlessness of water, facial expressions, gestures, clothes, accessories and gadgets—each offers a wide range of possibilities for artistic images, which will certainly attract the attention of the viewer. If you want to “enchant” the viewer, it is worthwhile thinking in this way.
Ocean shoots. Only very few photographers practise artistic underwater model photography in the sea, especially in depths where it is not possible for a model to comfortably stand on the seafloor. Shooting in open water is still possible, but requires more effort, and sometimes also carries higher risk. In this type of photography, the model dons no dive equipment, sometimes not even a dive mask. Rather, the model is dressed in photogenic costuming (or sometimes, not at all), wears make-up and is decorated overall as if it were a “topside” photo shoot.
So, how does one photograph such a model in open water while still ensuring the best possible safety? Here is a possible solution: First of all, you need to find a model who is not just “watery” and fluid, but rather a “fish” herself. In such shooting concepts, models with very good knowledge and experience in freediving have real advantages, including knowledge of self-protection. It is important that the model feels very natural and “free” underwater, even without any dive equipment.
You will also need a backup diver, who is also responsible for the transport of, and the air supply for, the model. This safety diver is a fully equipped scuba diver, who, in the best-case scenario, has his or her octopus mounted on an extra-long hose.
Of course, the location of the shoot should be clearly defined during the preparations and be known to all participants involved. If it is possible to swim along the surface of the water, the model sticks to the safety diver, who, in turn, acts as a “taxi,” as it were. The model wears a dive mask. If the location of the shoot has to be dived, the model sticks to the back-up or safety diver (who also secures the model by holding on to the model’s arm or hand, for example) and breathes out of the back-up diver’s secondary regulator. Together, they (photographer, model and back-up diver) will go to the agreed place of action. Long distances are to be avoided.
Once there, the following happens: The model and back-up divers take their previously planned positions. The model also has a dive mask on and breathes from the second regulator of the safety diver. The photographer also takes his or her previously planned position. Then, the photographer takes a few test shots to adjust exposure and other camera settings. Meanwhile, the model continues to breathe out of the secondary regulator.
Once this is done and everyone is ready, the model removes the dive mask, transfers it to the back-up diver and takes the second regulator out of her or his mouth, which is then picked up and secured by the back-up diver. The back-up diver now swims out of the field of view of the camera; usually, one to two metres away is far enough. The photographer gives the safety diver the corresponding signal (“free field”).
The model then takes the previously planned pose, and the photographer takes several shots of the scene. At no point does the back-up diver take his or her eyes off the model, for safety reasons, keeping the second regulator ready to hand it to the model at any moment.
If the model feels the need for air, the model places the right hand to the mouth—a signal that was, of course, also previously agreed upon. If the back-up diver sees the “I need air” signal, he or she immediately swims quickly to the model, secures the model with one hand on the arm and offers air via the octopus to the model with the other hand, placing the regulator on the mouth of the model (as the model has no dive mask on, so cannot see very clearly).
If the model feels ready for a second round after a few (or more) breaths, the model takes the second regulator out of the mouth and poses again. The back-up diver picks up the octopus, swims out of the camera’s field of vision and never lets the model out of sight, always ready to offer air or other assistance if requested.
When the shoot is finished, the back-up diver first provides the air supply to the model, securing the model by holding her or him, and then hands over the dive mask. The model puts on the mask, blows it out and after a general “OK” signal, everyone swims back to shore or to the boat.
Safety aspects. This technique is generally considered an example of how some professionals realise such photos and is by no means recommended without adequate training and serious practice in a pool, for example. Procedures, signals and emergency procedures must be strictly agreed upon and adhered to by all involved, and they must be practised first in very shallow water (at a depth in which one can still stand on the bottom) until everyone feels safe and comfortable.
Even if only one of the participants feels unwell (also mentally), it is a clear sign to abort the shoot. Keep such shooting sessions as short as possible. If concept, plan, preparation and teamwork are correct, the desired image should be in the can after 10 to 15 minutes.
Never forget that the model is not protected from the cold by a neoprene wetsuit like you are. This also calls for a speedy shoot. Hot drinks and warm, dry clothes must be ready for the model upon return aboard a boat or to land. Take into account in your photo dive that two people (the model and safety diver) are breathing from the same scuba tank; available air will be depleted faster.
Pool shoots. For underwater model photography, swimming pools offer the advantage of a more or less configurable underwater studio—a versatile and usable playground for the model and the photographer, so to speak.
Almost everyone is familiar with swimming pools, and nearly everyone has refreshed themselves in a swimming pool at some point or another. A pool is ultimately a (water-filled) space with clear boundaries, unlike the sea. Especially underwater models who are not so experienced will feel safer and therefore more comfortable in a pool. Despite having open water in the deep end, the pool is usually perceived as a “familiar environment,” and in any case of doubt or feelings of discomfort, the safe edge of the pool is reached quickly, or if in the shallow end of the pool, one can just stand up to get air at the surface. These factors immensely support a relaxed as well as safe working atmosphere.
Dry clothes, towels, drinks and refreshments, as well as quiet areas should be within easy reach. Music can even be played in the pool area to promote relaxation or a “good mood.” In that sense, the often-spurned swimming pool has its good points.
On the other hand, even a clean and beautiful pool is not necessarily photogenic, with its tiles, ladders, and sometimes pool lane dividers. So, it often makes sense to have a few basic accessories at hand.
General sets and props. Fabrics, and lots of them. Black, white and red are colours that always work well. Have some larger pieces (3m x 3m) ready to serve as backgrounds. Umbrellas, chairs, mirrors… basically any item of everyday use will make an excellent decoration, assuming you have the pool owner’s consent, which, of course, should be obtained beforehand.
Costume. From basic swimwear to elegant evening attire, the possibilities are endless. Gone are the days of the underwater model in neoprene (which is often not very photogenic). Now, it is time to get fashionable and creative! Whether models are in business attire, a red evening dress (red always goes well!), a tux or a “little black dress,” trouser suits or just draped with a few (almost) transparent pieces of cloth from the prop box—anything goes, and everything is allowed. Once the photographer and the model get caught up in the “play instinct,” there is no stopping them and things get fun! Great photos, then, almost create themselves.
Makeup. Mascara, lipstick, nail polish, highlights, glitter, and in some cases, also artificial eyelashes, are standard. In general, make-up for underwater models may be “a little bit more” heavy or theatrical than so-called “discreet make-up,” which will simply disappear in an underwater shooting situation. Make-up colours should be tailored to the skin and eye colour of the model, as well as the colour of the clothing, hair and the water itself (which is usually turquoise in pools).
It is important to use only waterproof make-up products. It is better to use gel or cream-based products instead of powder. However, cosmetic products in powder form can be mixed with a neutral gel to become water-resistant. Especially for the eye area, lighter colours are often recommended. Too dark make-up on the eyes can often make them look “fatigued” in the resultant photo, and complicate things for the photographer trying to achieve an appealing illumination. Make-up can have a supporting effect here, highlighting the facial features and eyes of the model or even providing artistic flair. It simply depends on how the photographer imagines the photo. Some glitter (silver or gold) can provide beautiful colour and light accents.
With fake eyelashes, one should remember that the glue does not last very long. Waterproof make-up products often lose their water resistance when the pool is over-chlorinated. So, the less chlorine, the better. This also applies to the eyes of the model, which in chlorinated water, become irritated and turn red relatively quickly. Eye drops are a great help during breaks between shoots. It is also good to have someone available who takes care of the make-up of the model.
Professional underwater models recommend make-up products by She Laq, MAC (its “SudioFix” product line), Temptu (its “Dura Skin” product line), Make Up Forever and Yabi Pearl Paints. However, all this is not mandatory. Of course, you can also photograph your model in his or her natural, unadorned beauty.
Accessories. Jewellery, sunglasses, long ribbons (braided into the hair), fancy belts, bracelets, toe rings or even body paint can provide interesting accents in an image.
Poses and facial expressions. There are no limits. Floating naturally or floating spherically, sitting on the ground, standing, lying down or performing ballet-like dance movements—the possibilities are endless. When in doubt, a smile always works wonders.
Brief tips and safety
• If the pool is too deep to stand in, the shoot should take place as close to the edge of the pool as possible, so that the model can emerge at any time at the edge of the pool to rest.
• Some freediving training for the model works wonders. Instead of struggling with inflated lungs and cheeks while submerged underwater, it is better that the model exhale before diving.
• Keep the individual shooting sequences as short as possible. Usually, a model can hold a pose underwater for only 10 to 20 seconds. Depending on the well-being of the model, a 10 to 15-minute break should be taken after ten of these kinds of sequences.
• Try to schedule at least half a day for a pool shoot (including preparation, photography, breaks and wrap-up).
• Plan rest breaks for models to recover, warm up, touch up make-up and for interim meetings. It is advisable to have another person on hand, stationed at the edge of the pool, to provide help and support when needed.
• The pool should be clean and not overly chlorinated.
• When photographing in outdoor pools with sunlight exposure, it is also possible to work with the natural ambient light as the light source.
• High-intensity wide-angle lenses with an effective focal range of 16-20mm are used mostly in this type of photography.
• In addition to underwater strobes, other light sources such as underwater photo lamps or slave flashes can be used to achieve special lighting effects as well as to lighten shadows.
• Very special photos can be obtained by shooting sessions in the dark (during the evening or at night).
• Try to make sure your pool images do not lose the relationship with the element of water. It often helps to have the water’s surface at least partially visible in the image. Reflections of the model on the water’s surface are always welcome classics. If the viewers do not understand an image was made underwater, all your efforts were for naught.
And never ever forget: Happy model = Great resulting images! Always keep your model happy, share the joy and share the success. ■


")