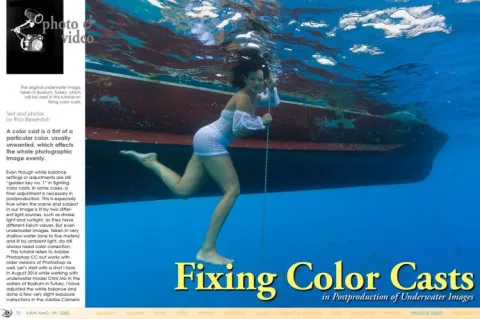
A color cast is a tint of a particular color, usually unwanted, which affects the whole photographic image evenly.


Contributed by
Even though white balance settings or adjustments are still “golden key no. 1” in fighting color casts, in some cases, a finer adjustment is necessary in postproduction. This is especially true when the scene and subject in our image is lit by two different light sources, such as strobe light and sunlight, as they have different Kelvin values. But even underwater images, taken in very shallow water (one to five meters) and lit by ambient light, do still always need color correction.
This tutorial refers to Adobe Photoshop CC but works with older versions of Photoshop as well. Let’s start with a shot I took in August 2016 while working with underwater model Chris Mo in the waters of Bodrum in Turkey. I have adjusted the white balance and done a few very slight exposure corrections in the Adobe Camera Raw filter, and this is how the image looks now in the Adobe Camera Raw window (see Photo 1).
Even after adjusting the white balance in Adobe Camera Raw, I still sense a few problems caused by color casts. We cannot judge an image without examining it, and when it comes to postproduction, we should take a very close look at each image. I divided the image into a few “zones,” just so one can visualize where to look (see Photo 2).
Zone 1: The red of the boat looks pretty much washed out, and it has a serious cyan color cast.
Zone 2: The model’s dress is white, but it does not appear as white. We spot a cyan color cast in the whites of her dress.
Zone 3: The lower hull of the boat looks washed out.
Zone 4: Way too much cyan makes her skin not so nice-looking.
Why did this happen?
Distance to the subject. The longer the distance, the higher the risk of color casts.
Insufficient strobe lighting. The strobes were not powerful enough to light the main subject nicely. Whilst my right strobe fired, the left one malfunctioned and did not fire at all.
Two different light sources with different color temperatures: the sunlight and the light from the strobe.
So, what can we do?
Photoshop offers a few “auto” functions such as “Auto Color,” “Auto Tone,” “Auto Contrast” and “Auto Curves.” First of all, such automatic corrections are surely worth a try but rarely end in pleasing results when it comes to editing underwater images (see some “negative examples” in Photos 3 to 6).
None of these auto functions really helped but, regarding colors, hope lies in the use of curves. Let’s see how to improve this image by editing these curves manually.
1. Open your image in Adobe Photoshop (see Photo 7).
2. Create a “Threshold” adjustment layer by clicking on its icon in the Adjustments panel on the right (see Photo 8). Do not be afraid if your image looks weird for a short while; it’s for its own good.
3. Select the Color Sampler tool in Photoshop’s Tools panel on the left (see Photo 9).
4. Move the small slider in the threshold adjustment layer’s Properties tab (located in the Adjustments panel) completely to the left and then to the right, until a black area appears in the image (see Photo 10).
5. Zoom into the image and place a color sample by clicking in that black area (see Photo 11). You now have a small color pick with a “1” beside it. Check the Info tab to the right. As we just picked the black point, it is supposed to be 0 (= black), but it is not. A green (35) and blue (52) color cast is in the blacks. Good to know—the mix of green and blue turns out to be our old enemy, cyan.
6. Now, go back to the threshold adjustment layer and move the small slider in the Properties tab to the right and then back to the left until you spot the first white point. Zoom in and, with the color sampler, click in this white area to pick a second sample (see Photo 12). The Info tab now shows you the values of our two color samples (see Photo 13). Color picker sample no. 1 shows a green and blue color cast (all values are supposed to be “0”) in the blacks, while picker no. 2 (which marks the white point) shows multiple color casts in the whites. The ideal value would be 255 (= pure white), but that is not the case here.
7. Delete the threshold adjustment layer; we do not need it anymore.
8. Create a Curves layer (in the Adjustments panel). Grab the first Eyedropper Tool sampler in the layer’s Info tab, locate your previously placed “color pick no. 1,” and click in it. Be precise; you will need to zoom in to make a correct pick (see Photo 14). Then, grab the third (not second) Eyedropper Tool sampler in the layer’s Info tab, locate your “color pick no. 2,” and click in there. See Photo 15 for the result.
This is the most precise technique to get rid of subtle to intermediate color casts in underwater images with mixed light. What we actually did was to correct the colors by defining the black and white points and utilizing the Curves tool to adjust the range. Properly set black and white points are, by the way, the preferred method of color correction in magazines and other print media, up to and including the mighty National Geographic magazine itself.
Final tips
Even though “technically correct,” you may sometimes find the result of this adjustment slightly too strong. Reduce the opacity of the “Curves correction layer” in such cases. Remember, if the result of this correction appears to be “too strong,” the image might lack some basic elements such as proper camera settings.
This editing technique works best with RAW images, as these contain much more data than JPG photos, and therefore, provide more space for later adjustments. It is worth the little extra work, so if you can, always shoot RAW.
There is no “special trick” in Photoshop (or any other image editing software) that is able to turn a “bad” photo into a good one. Postproduction should be thought of as a final finishing touch to make an already good photograph an awesome one.
As software, Photoshop has no notion of your intentions as a photographer, in terms of how you want your final image to look. It is just a tool, and the final decision is always yours, as it is your very own image. There are several very nice underwater images out there, which are praised by audiences, despite the fact that they have serious color casts. Just think of all those whale and shark images.
Please note that in postproduction, “many roads lead to Rome,” which means there are plenty of different workflows and ways to fix specific problems in an image. ■
Rico Besserdich is a widely published German photographer, journalist and artist based in Turkey. For more information, visit: Maviphoto.com. See his latest book at: Songofsilence.com.


")